Utilizing Cognitive Services for Dynamic Data Masking in PowerBI
It’s no secret that PowerBI doesn’t support Dynamic Data Masking (DDM) out of the box. So what do we do if we need to include PII data in our reports?
There’s a few options that quickly come to mind;
- Remove the data altogether
- Apply column level security to secure the column completely
- utilize Direct Query with an underlying data source that DOES support DDM (like SQL Server).
But in this blog, I’m going to propose another option. Utilizing Microsoft’s Cognitive Services API to detect and mask PII data.

Pretty cool huh?
But before we dive in, lets cover a few key points to this method.
- This is a Proof of Concept Only!
This method relies on Cogntive Services to identify and mask all data. This method should not be utilized in production without a full understanding and review of the service and any of its limitations. This blog is simply a Proof of Concept (PoC) on another potential option for PII masking. If you choose to implement this, you are accepting any and all associated risks of PII data leakage.
- This method does NOT require PowerBI Premium Licensing. Since we are utilizing a function to call the API service, and not utilizing a built in PowerBI AI Insights call, we can use this approach with PowerBI Pro licensing, or even directly in PowerBI Desktop (Free) if we are not publishing our results to the PowerBI Service.
OK…NOW lets dive in!
Prerequisites
Before we get started there’s a few pre-requisites you need;
- PowerBI Desktop Client
Download Here - Access to a cognitive services account
Set up a free account - Some personally identifiable data to mask. You can either create your own quickly or find a sample online. This doesn’t need to be complicated and I’ve provided some sample data below for you to follow along with.
Getting Started
In order to make this work you’ll need to get your endpoint and your API key from your Azure service. Once you have created your congitive services azure resource, these are quite easy to obtain from the overview blade of your Cogntive Services resource in the Azure portal.
Walkthrough
Step 1 - Create a PowerBI file
Open the desktop client on your machine and import the PII data you have created/downloaded. Here’s a sample you can use for this demo:
| text |
|---|
| My SSN is 859-98-0987 |
| Your ABA number - 111000025 - is the first 9 digits in the lower left hand corner of your personal check. |
| Bob’s phone number is 414-555-6767 |
Step 2 - Add Parameters
Lets create two parameters to help simplify our code.
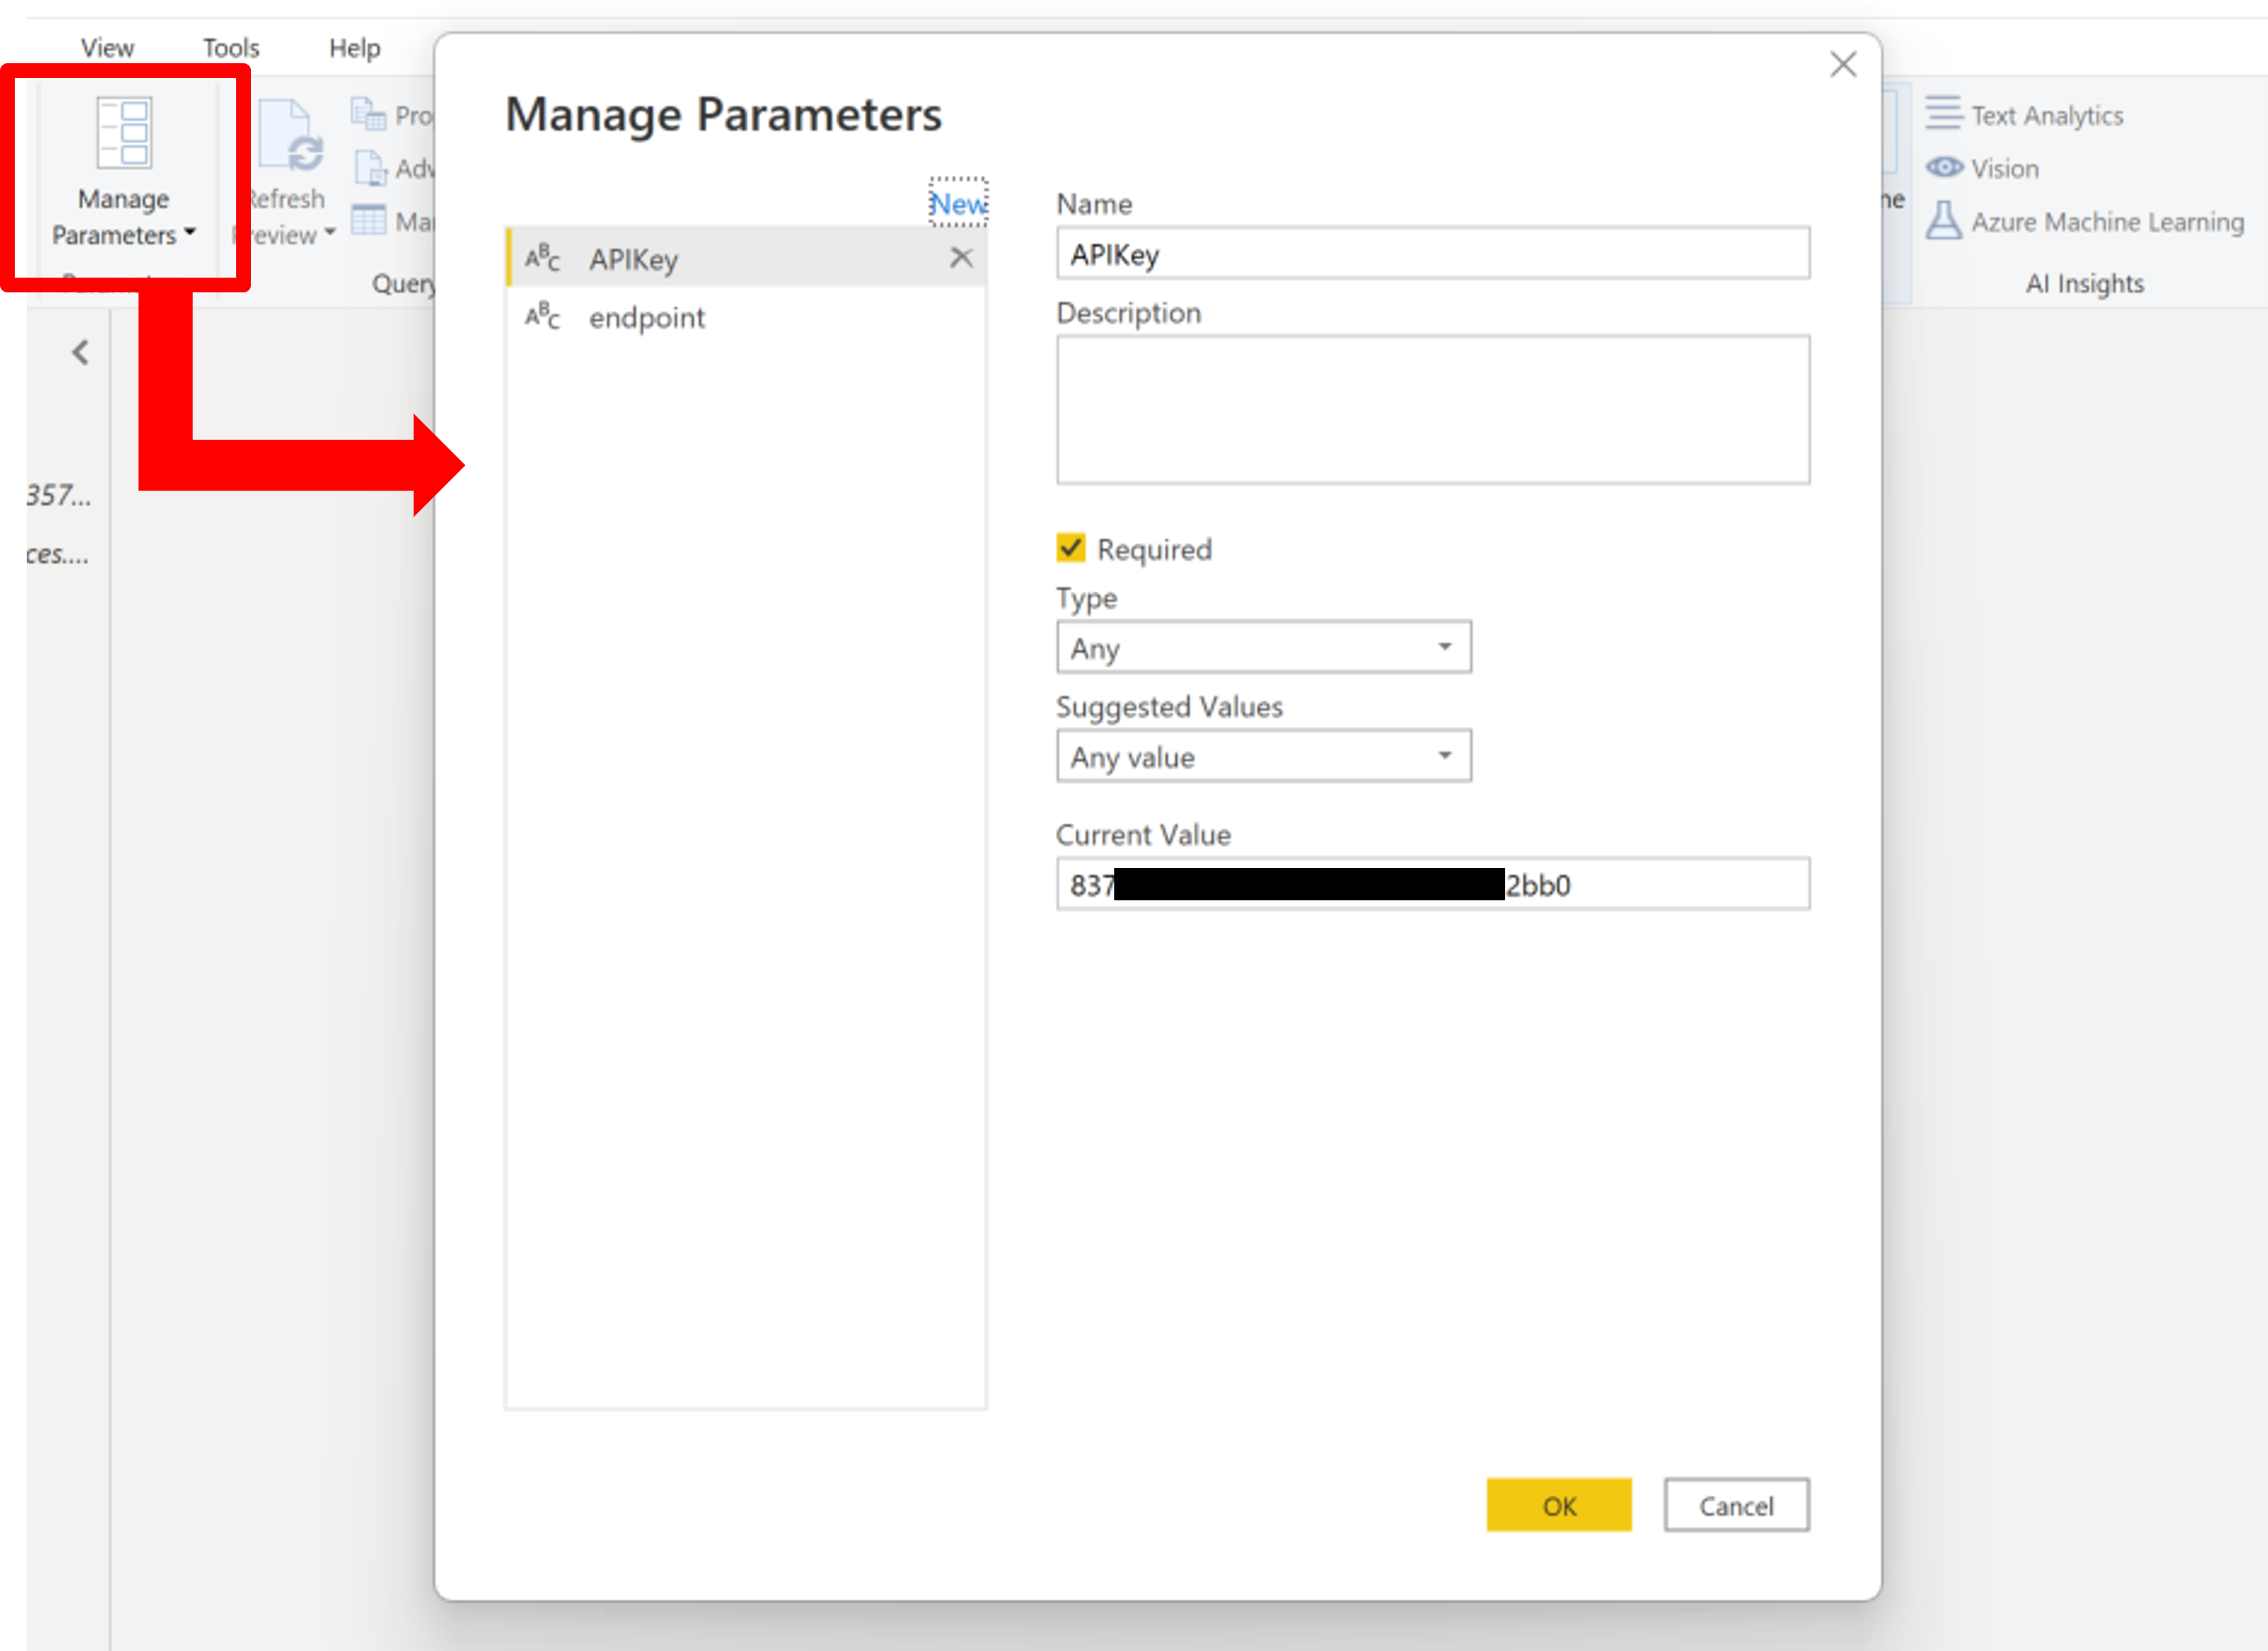
In the Power Query editor select “Manage Parameters” then create two new parameters;
- APIKey - which will hold your API Key obtained in the getting started section
- endpoint - which will hold the url for your Cognitive Services endpoint. It should resemble this format: http://yournamedservice.cognitiveservices.azure.com
Step 3 - Create a new M Function
If you’ve never done this before, we accomplish this by using “Get Data” and “Blank Query” (or if you’re in the Power Query Editor use “New Source” then “Blank Query”). I suggest naming your query “maskPII” but you’re free to use any name.
Next, open the advanced editor and paste in this M code
(text) => let
    endpoint =  endpoint & "/text/analytics/v3.1/entities/recognition/pii",
    jsontext    = Text.FromBinary(Json.FromValue(Text.Start(Text.Trim(text), 5000))),
    jsonbody    = "{ documents: [ { language: ""en"", id: ""0"", text: " & jsontext & " } ] }",
    bytesbody   = Text.ToBinary(jsonbody),
    headers     = [#"Ocp-Apim-Subscription-Key" = APIKey],
    bytesresp   = Web.Contents(endpoint, [Headers=headers, Content=bytesbody]),
    jsonresp    = Json.Document(bytesresp),
    maskedtext  = jsonresp[documents]{0}[redactedText]

in
    maskedtext
Let’s pause for a moment and take a look at this function;
First we pass a parameter called “text” (text) =>, this will be the text we want to scan for PII data.
Next, we define our endpoint. This is based on the parameter created in Step 2.
- To call the PII recognition service, we append
/text/analytics/v3.1/entities/recognition/piito our personal endpoint.
We then pass our text variable through a series of functions to create our jsontext which will be used in the body.
Text.Trim()will remove any leading or trailing whitespace.Text.Start(text, 5000)will take only the first 5K characters of our text string.Json.FromValue()will create a json representation of our trimmed text.Text.FromBinary()decodes data from a binary value into a text value.
jsonbody is where we construct the body of our API call. Guidance available in the API documentation
Next we define the headers required (also obtained from the API documentation) which include our APIKey (remember we set this parameter in Step 2).
bytesresp is where we issue the API call via the Web.Contents function, by providing the endpoint, the headers and the contents.
At last, we can retrieve our json result and convert it to a JSON document with Json.Document.
Now the only thing left to do is extract the data we want from our json. We can do that with [documents]{0}[redactedText] which extracts the redactedText element from the first object inside documents.
Simple right?
Step 4 - Bring it all together
Now the magic happens.
Go back to your imported data (query) in the Power Query Editor, select “Add Column” and then “Invoke Custom Function”. Select your function and point it at the column which contains your data.
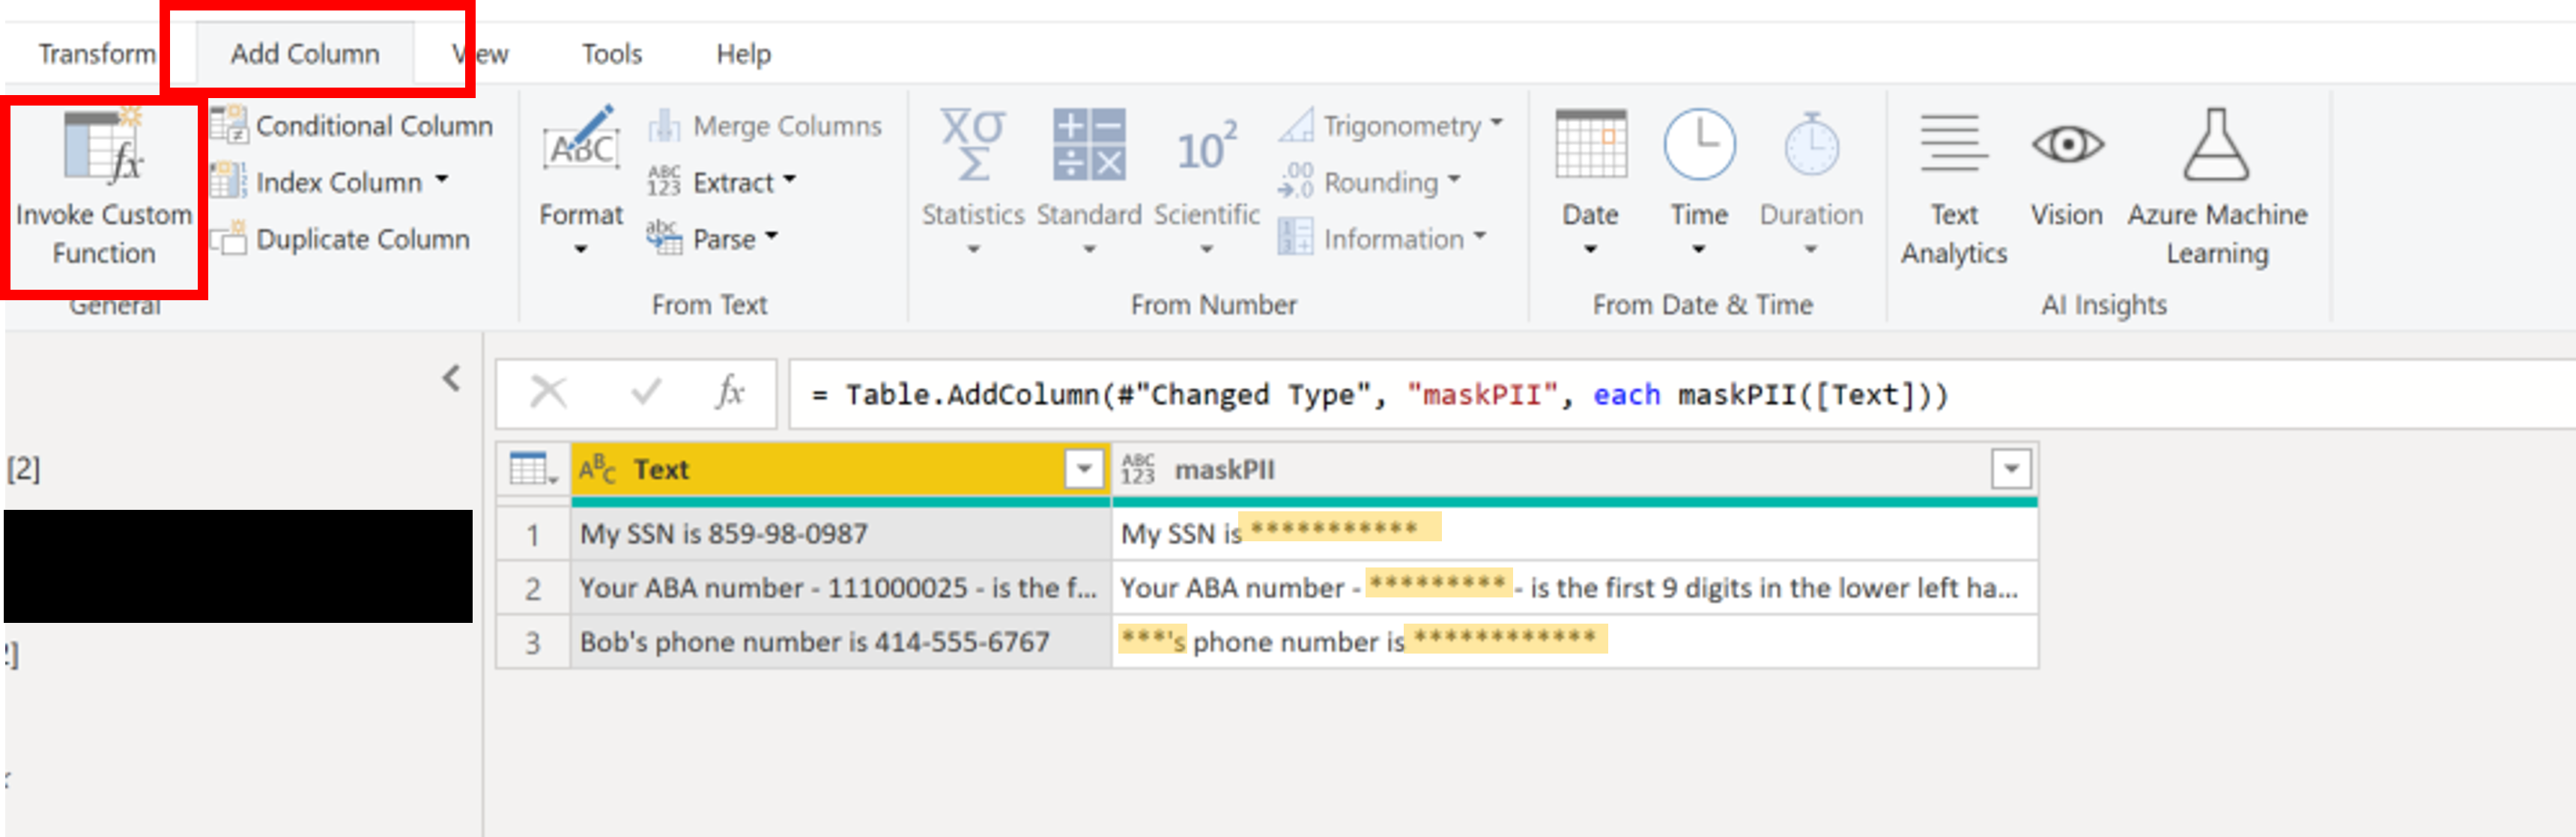
VOILA! PII data was automatically identified and masked by the service!
Next Steps
In this blog I demonstrated how to call Azure Cognitive Services from within PowerBI desktop to mask PII data discovered by the service. We did this line by line, using a very simple dataset. But in reality you’re likely using much larger datasets. In which case you may want consider:
Batch Processing
Cognitive Services will allow you to submit 1000 documents at a time in a single request. Thus, you’ll want to batch your requests in groups of 1000 to ensure you’re being efficient with your API calls (free services are limited and paid services charge you for number of calls).
There’s a great blog on The Excel Club which demonstrates how to batch requests for a different Cognitive Services API check it out.
Here’s the M code you’ll need for this;
(Source as table) as any =>
let
    url =  endpoint & "/text/analytics/v3.1/entities/recognition/pii",
    JsonRecords = Text.FromBinary(Json.FromValue(Source)),
    JsonRequest = "{""documents"":"&JsonRecords&"}",

    JsonContent  = Text.ToBinary(JsonRequest),
    headers     = [#"Ocp-Apim-Subscription-Key" = APIKey],
    bytesresp   = Web.Contents(url, [Headers=headers, Content=JsonContent]),
    jsonresp    = Json.Document(bytesresp)
in
    jsonresp
Incremental Refresh
In addition, consider implementing incremental refresh if possible. Rather than having to re-run all of your data through the API, wasting calls and potentially money, consider only calling the API for newly added data. More information on Incremental Refresh in PowerBI can be found here
Happy PowerBi’ing!
Resources
I could not create these wonderful solutions and blogs without the great work of others, so here’s a list of resources utilized for this blog.