Customizing Detect Data Changes in PowerBI Incremental Refresh
Detect Data Changes is great for optimizing refreshes, but what happens if you dont have a date field to flag modifications?
Introduction
If you are a PowerBI user, you’re probably familiar with the incremental refresh feature, which allows you to refresh only the data that has changed since the last refresh, rather than the entire data set. This can help you reduce the load on your data source, improve the performance of your reports, and save time and resources.
You might also be aware that you can further enhance this capability using the “Detect Data Changes” feature, which enables you to specify a column that indicates whether the data has changed or not. By default, PowerBI uses the modified date column as the detect data changes option, but did you know you can use other columns or queries that suit your business logic and/or data structure?
In this post I’m going to show you how!
The Challenge
Let’s pretend you’re the Contoso data team and you’ve got a large sales fact table for which you’d like to leverage incremental refresh. But due to manual adjustments and returns that occur regularly, you cannot be sure your historic data doesn’t change. And what makes matters worse, your sales data doesn’t contain a “last update date” field so you can’t be sure if or when your historic data changed.
Thus, you’ve resorted to full refreshes of your fact table, a practice that is not efficient and not recommended, and is now leading to performance issues and potentially missed Service Level Agreements (SLAs) with your business. What a nightmare! Before we solve our business problem lets get a little background to how things work in the PowerBI service.
How Detect Data Changes Works
The detect data changes option is a column or a query that PowerBI uses to determine whether the data in a partition has changed or not. If the data has changed, PowerBI will refresh the partition. If the data has not changed, PowerBI will skip the partition and reuse the data from the previous refresh.
By default, and the only option available using the User Interface (UI), PowerBI uses a datetime field which is intended to indicate modification of the record. Most commonly, these fields appear in data sources as “Modified Date”, “Last Update Date”, or “Load Date”, to provide a few examples. But obviously, the field name doesn’t matter. There are 2 important points I want you to take away from this information.
- Even though you have a field at the record/row level indicating changes, when a change is detected by PowerBI, the entire partition is updated, not just the record. This is a commonly misunderstood point which can lead to larger than expected refreshes.
- This process means that PowerBI must use an aggregate function across each partition to determine change. In fact, the aggregate function used is referred to as a “polling expression” and by default is a MAX(columnname) function. And as mentioned above, in the UI, you can control the “columnname” but you cannot control the function. Note, these are really M expressions, not DAX functions, so the code is little more complicated that I’ve shown here, but the concept is the same, and for now, the concept is all that I want you to grasp. But that doesn’t mean we can’t control the polling expression it just means we need to use some different tools.
How to Use Sales Data Totals as a Detect Data Changes Option
Now that we have a general understanding of the detect data changes option, let’s see how we can create a custom polling expression instead of the default expression to control our refreshes to address the business problem at hand (i.e. changing sales data with no modified date field)
Remember, Contoso’s sales system is fluid and historic data can change due to manual overrides, returns, and other factors.
For this example, we’re going to assume that any time our fact data changes, the sales amount would have to change as well. And in this way, we can use our sales amounts, rather than a date field, to identify changes in our historic data. Again, this process can be applied to almost any field in your data to achieve your required business logic, the key here is just understanding how it works. To use sales data totals as a detect data changes option, we need to follow these steps:
- Configure Incremental Refresh with detect data changes on our semantic model.
- Publish our semantic model and apply refresh policy.
- Create a custom polling expression.
- Refresh our data to set a refreshBookmark
- Test our solution
Let’s go through each step in detail.
Note
If you want to follow along with this example, I am using the ContosoRetailDW sample available from Microsoft
Step 1: Configure incremental refresh with detect data changes
I’m going to skip the details here since there’s lots of documentation available on how to configure this, including but not limited to the Microsoft docs
From the FactOnlineSales table, we can configure our Incremental refresh as follows:
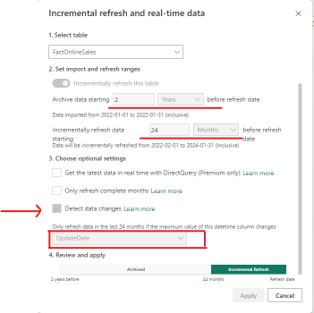
I’ve elected to archive 2 years worth of data and incrementally refresh 24 months. I’ve further checked the Detect Data Changes box and selected a date field from my table (in this case update date, but it can be any date). It’s worth noting that Update Date is blank in my dataset anyways. Why did I choose 2 years archive but 24 months refresh? Aren’t those the same thing? This is an important piece to understand from an efficiency perspective, but it doesn’t change what we’re doing with our refresh.
Let me explain.
The input box for “incrementally refresh data starting…” controls the automatically generated partitions in the backend. By choosing 24 months, instead of 2 Years for this selection, we force PowerBI to use monthly partitions of our data rather than yearly partitions. This results in smaller refreshes when a change is detected (eg. We can refresh only the data from January 2024, instead of all the data from 2024) and results in more efficient refreshes.
The value you select in your environment will depend on your business needs and your data. I am not suggesting monthly is always the correct value, but rather suggesting that you understand what this parameter is doing so you can be as efficient as possible.
Step 2: Publish the model and create partitions
The next thing we need to do is publish our model to the service. Do not refresh your model just yet, instead we want an empty model where we will create our partitions and edit our incremental refresh policy before a refresh is conducted.
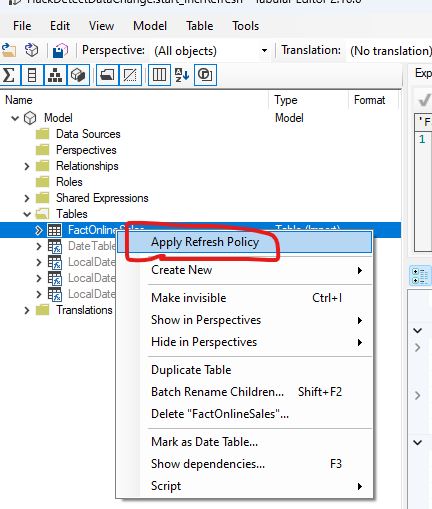
With our model published we will connect to it via the XMLA endpoint using an open source tool Tabular Editor. For more information on enabling and connecting to the XMLA endpoint review this document. Once connected, the first thing we need to do is create our partitions using the “Apply Refresh Policy” option in Tabular Editor. Right click on the table and select this option.
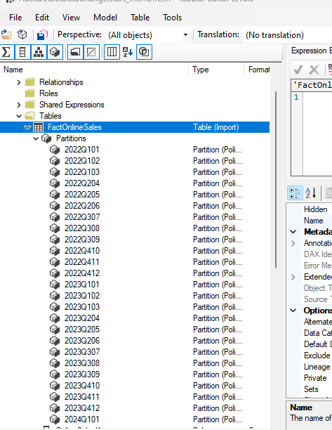
This will create our partitions according to our policy, which you can view by expanding the partitions section as shown here. Note, since the partitions are relative to the current date and rely on the values you entered in your policy, you will see different partition names, and possibly different granularity, than this screenshot.
Step 3: Create a custom polling expression
Now we can update our incremental refresh policy to include our custom polling query. To see the Refresh Policy, select the table name (in my case FactOnlineSales) and scroll down in the properties window to the “Refresh Policy” section.
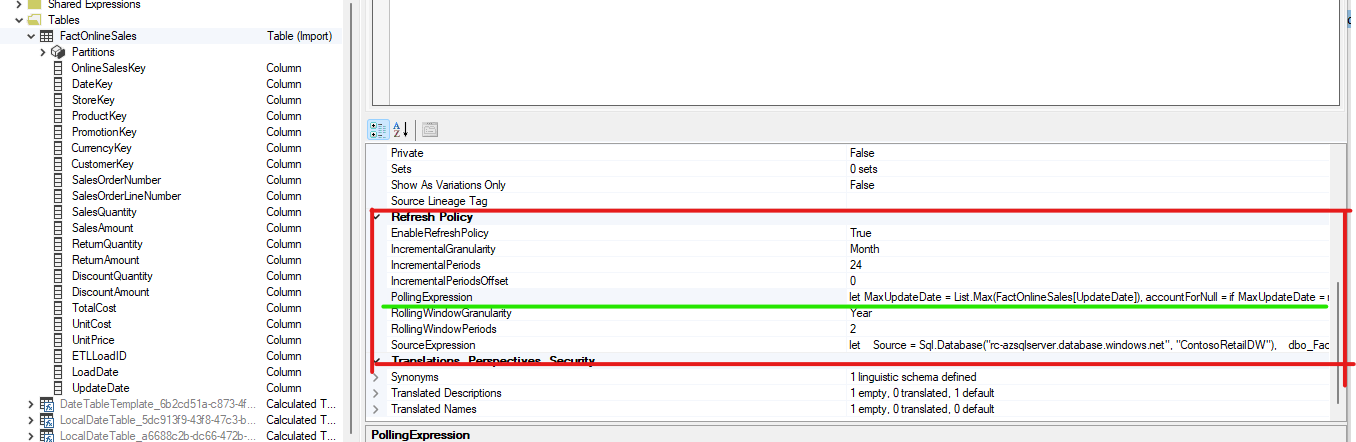
Take note of the PollingExpression property which should look something like this:
let
MaxUpdateDate = List.Max(FactOnlineSales[UpdateDate]),
accountForNull = if MaxUpdateDate = null then #datetime (1900,1,1,0,0,0) else MaxUpdateDate
in
accountForNull
The polling expression returns a single value (scalar) for each partition which is called a “refreshBookmark”. When a refresh is initiated, the polling expression is evaluated for each partition and compared to the value stored in refreshBookmark. If values are equal no action is taken, otherwise the partition is refreshed.
Taking a close look at the default polling expression we can see the date we chose in our Incremental Refresh Policy UI (Step 1) is being used to calculate a maximum date. There is an additional step to account for the possibility of a Null value (aptly named “accountForNull”). So, in cases where this field is Null, a substitute value of January 1, 1900 is used. Now lets update this query, and instead of using a Max(Date) concept to create our refreshBookmark, we’ll use a Sum(SalesAmount). The resulting M query looks like this
let
salesTotal = List.Sum(FactOnlineSales[SalesAmount]),
accountForNull = if salesTotal = null then 0 else salesTotal
in
accountForNull
We’re replacing List.Max which returns a maximum value from a list with List.Sum which returns the sum of the list. Furthermore, we update the field that will provide the list (from UpdateDate to SalesAmount).
Now our polling expression calculates the sum of the salesAmount column for each partition, stores the value in the refreshBookmark, and then uses this as the comparison for future refreshes. In future refreshes, only partitions that have had a change in total sales amount will be refreshed.
Step 4: Refresh the model
It’s interesting to note that even though we applied the refresh policy in step 2, which created our partitions, a refreshBookmark was not calculated for each partition, since no data was refreshed and thus there is no way to calculate a bookmark. We can verify this by scripting our table to TMSL (using SQL Server Management Studio) and inspecting the partition definitions as shown here.
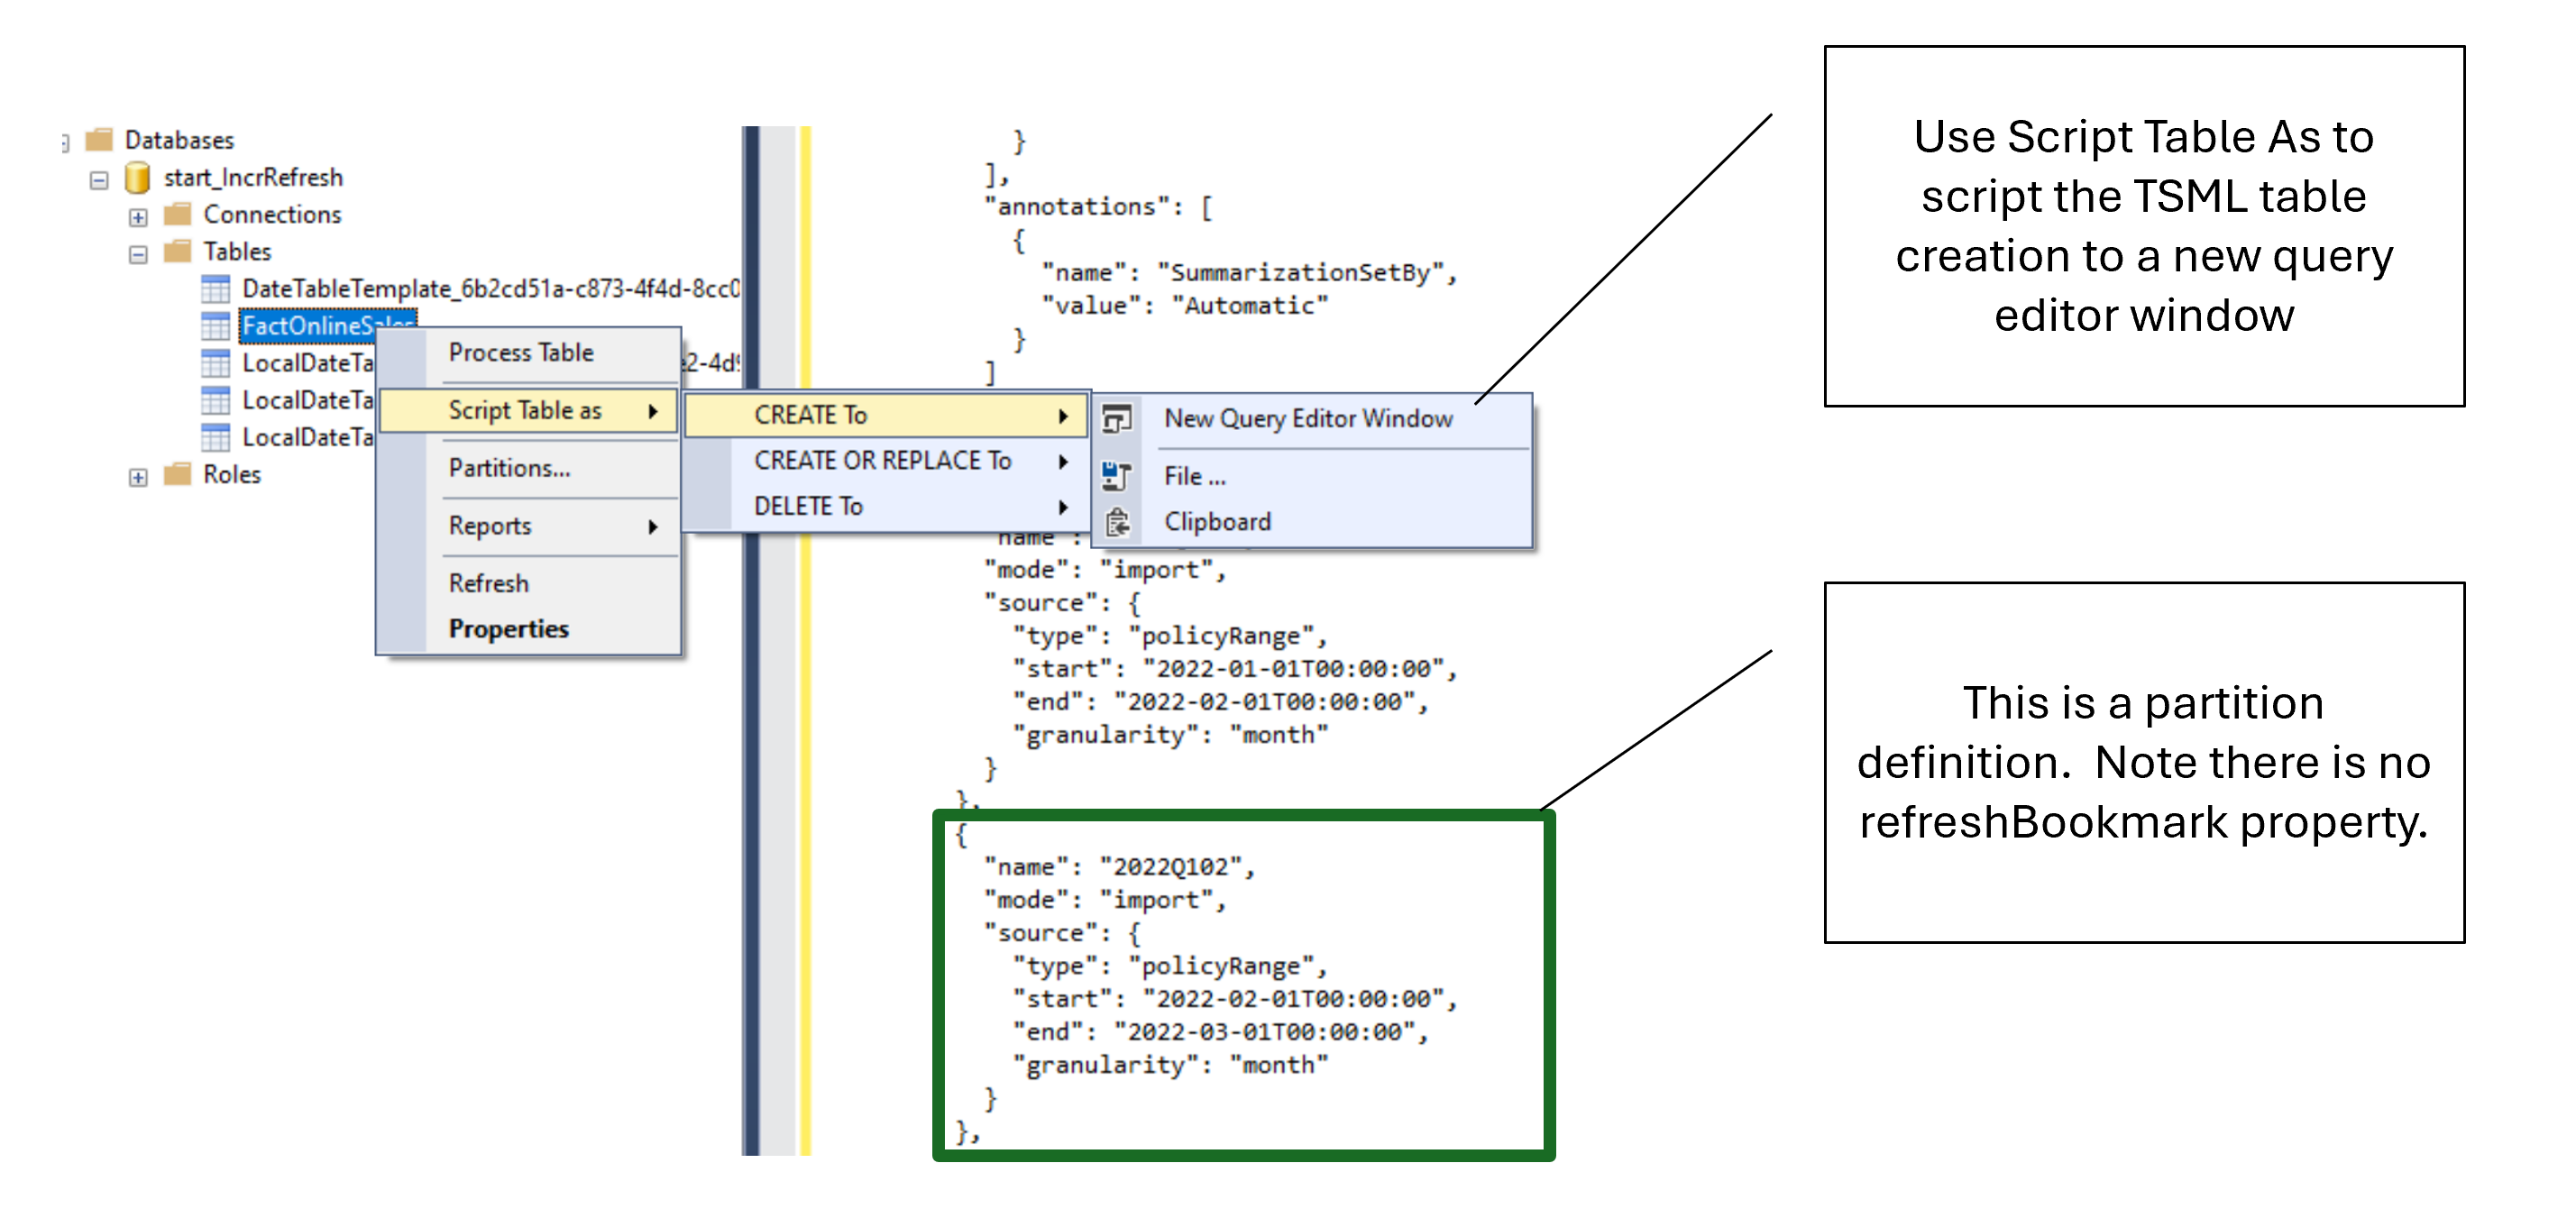
To create the first refreshBookmark we will need to refresh our data to give the model something to calculate the bookmark on.
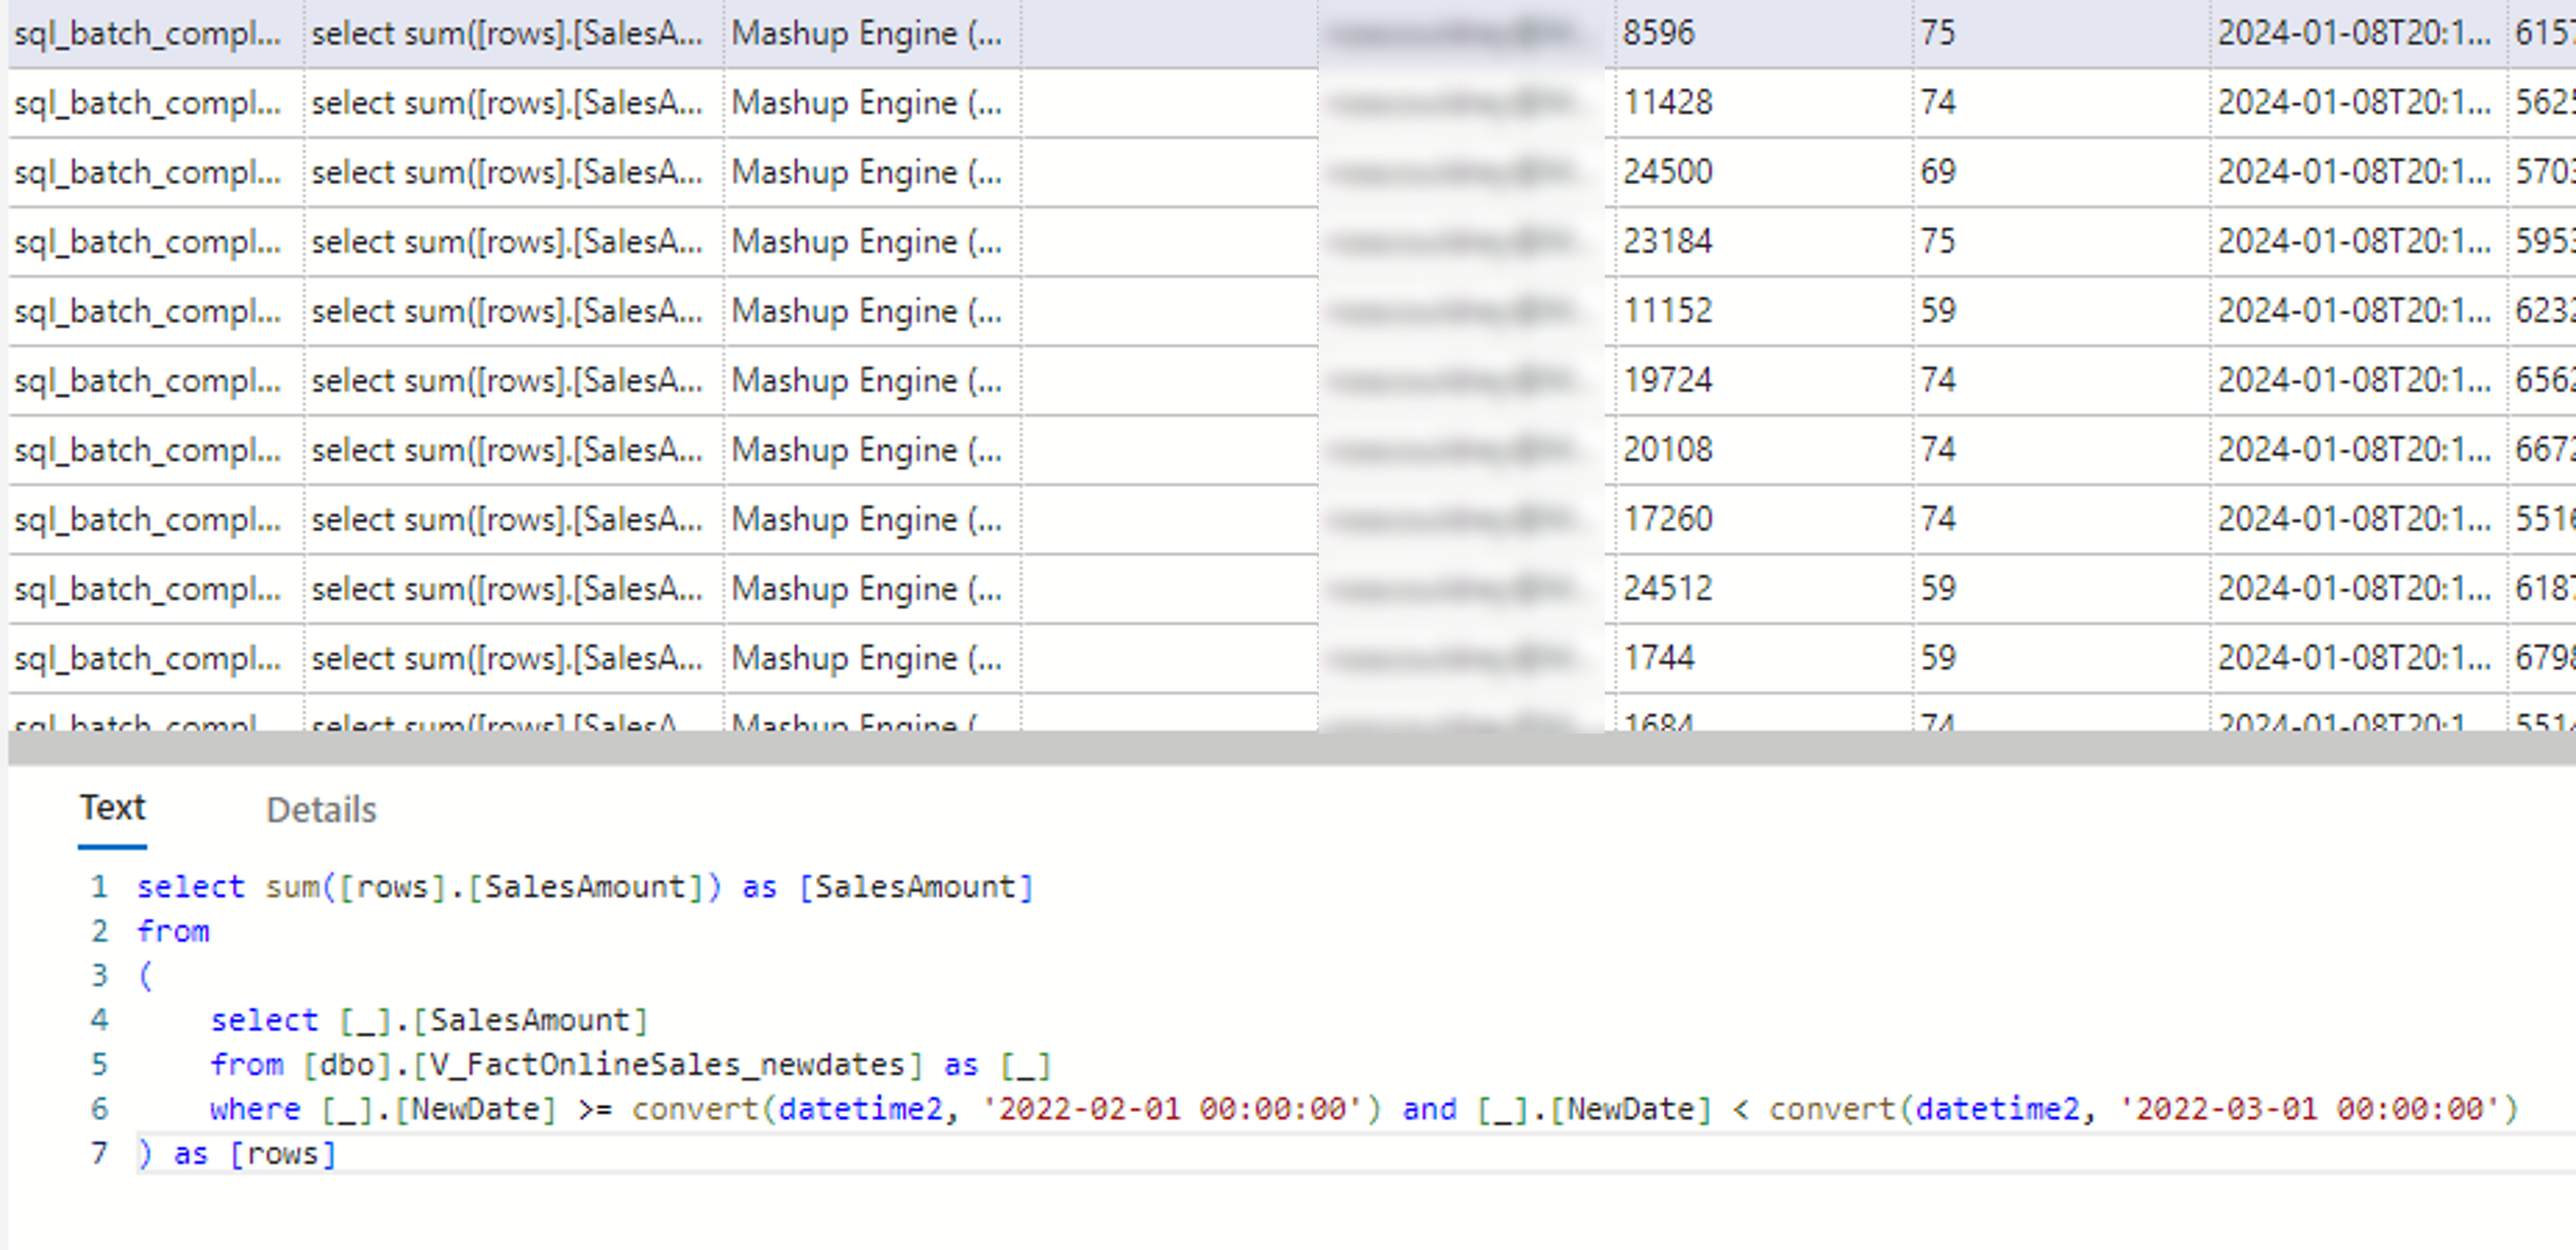
If we run a trace on our source while this refresh is running we will explicitly see the polling expression being executed for each partition. Here’s an example showing the polling expression for the February 2022 partition.
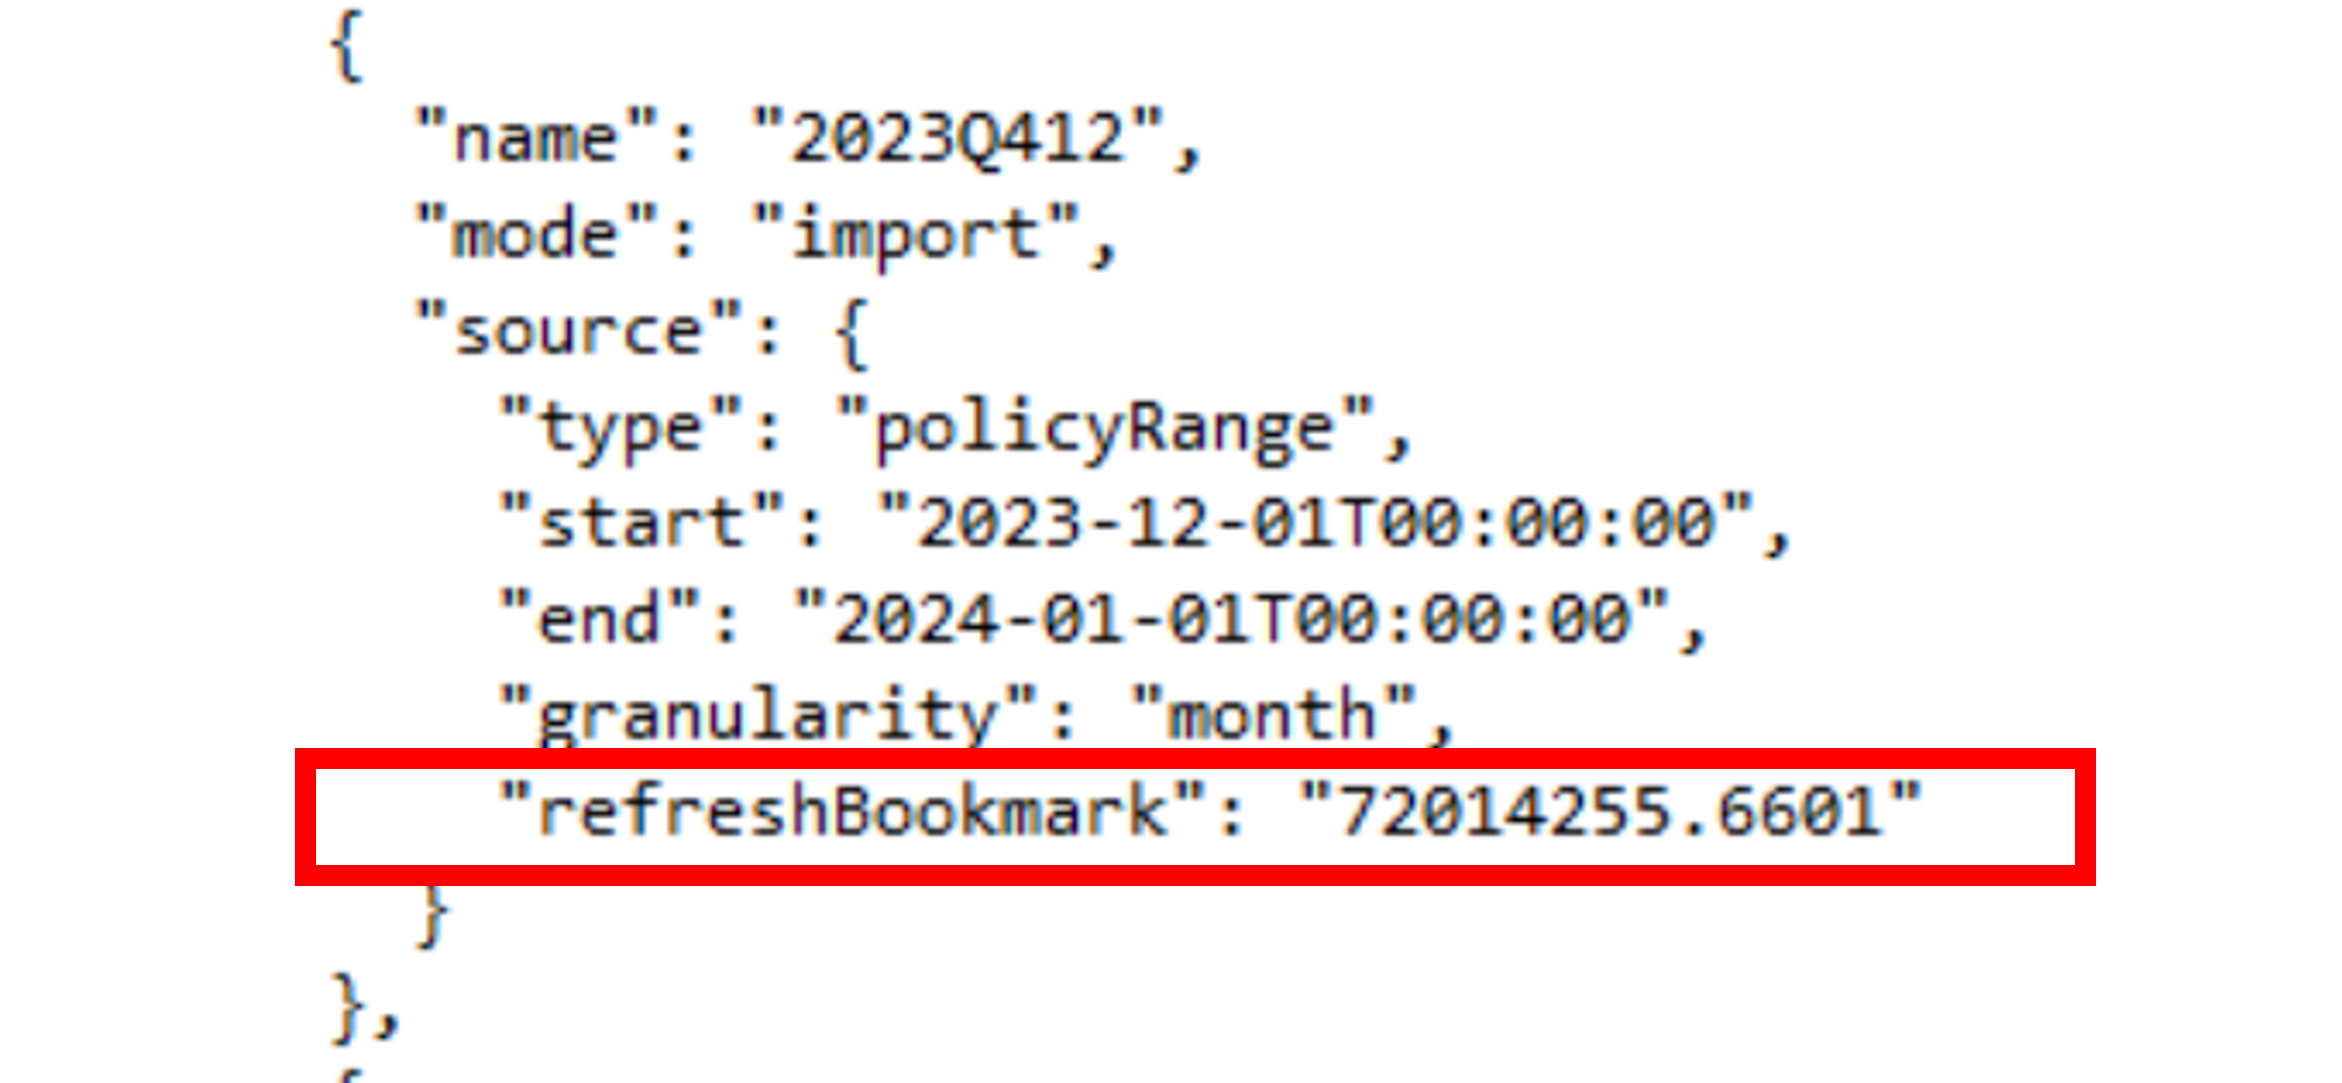
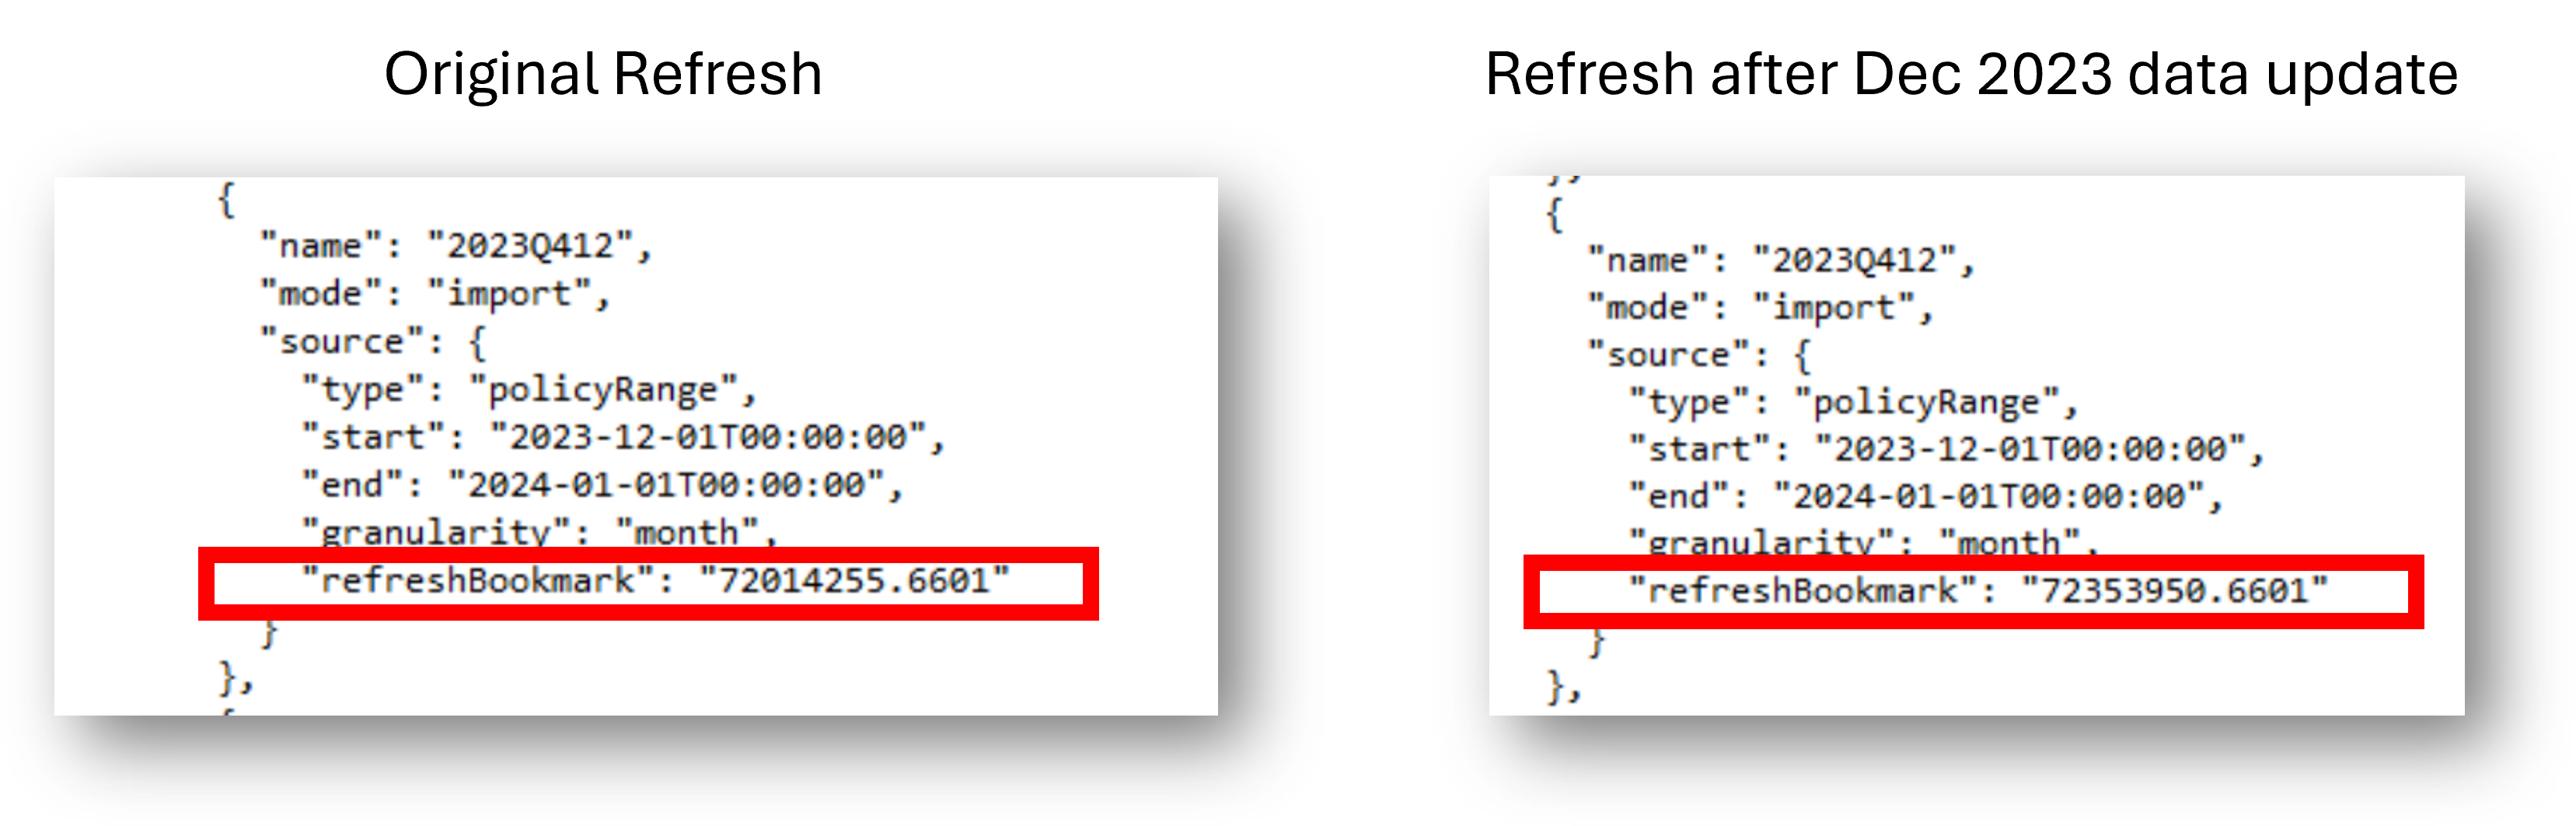
And now with our refresh completed, we can view our TMSL via “create to New Query Editor” and see that our partitions now have a refreshBookmark property associated to them as expected. For example, the refreshBookmark for the December 2023 partition is 72,014,255.6601.
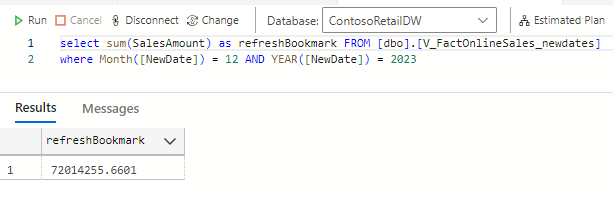
And we can confirm this is the correct amount with a simple SQL statement to our backend:
Step 5: Testing the solution
To test the solution, we’ll perform 2 distinct refreshes.
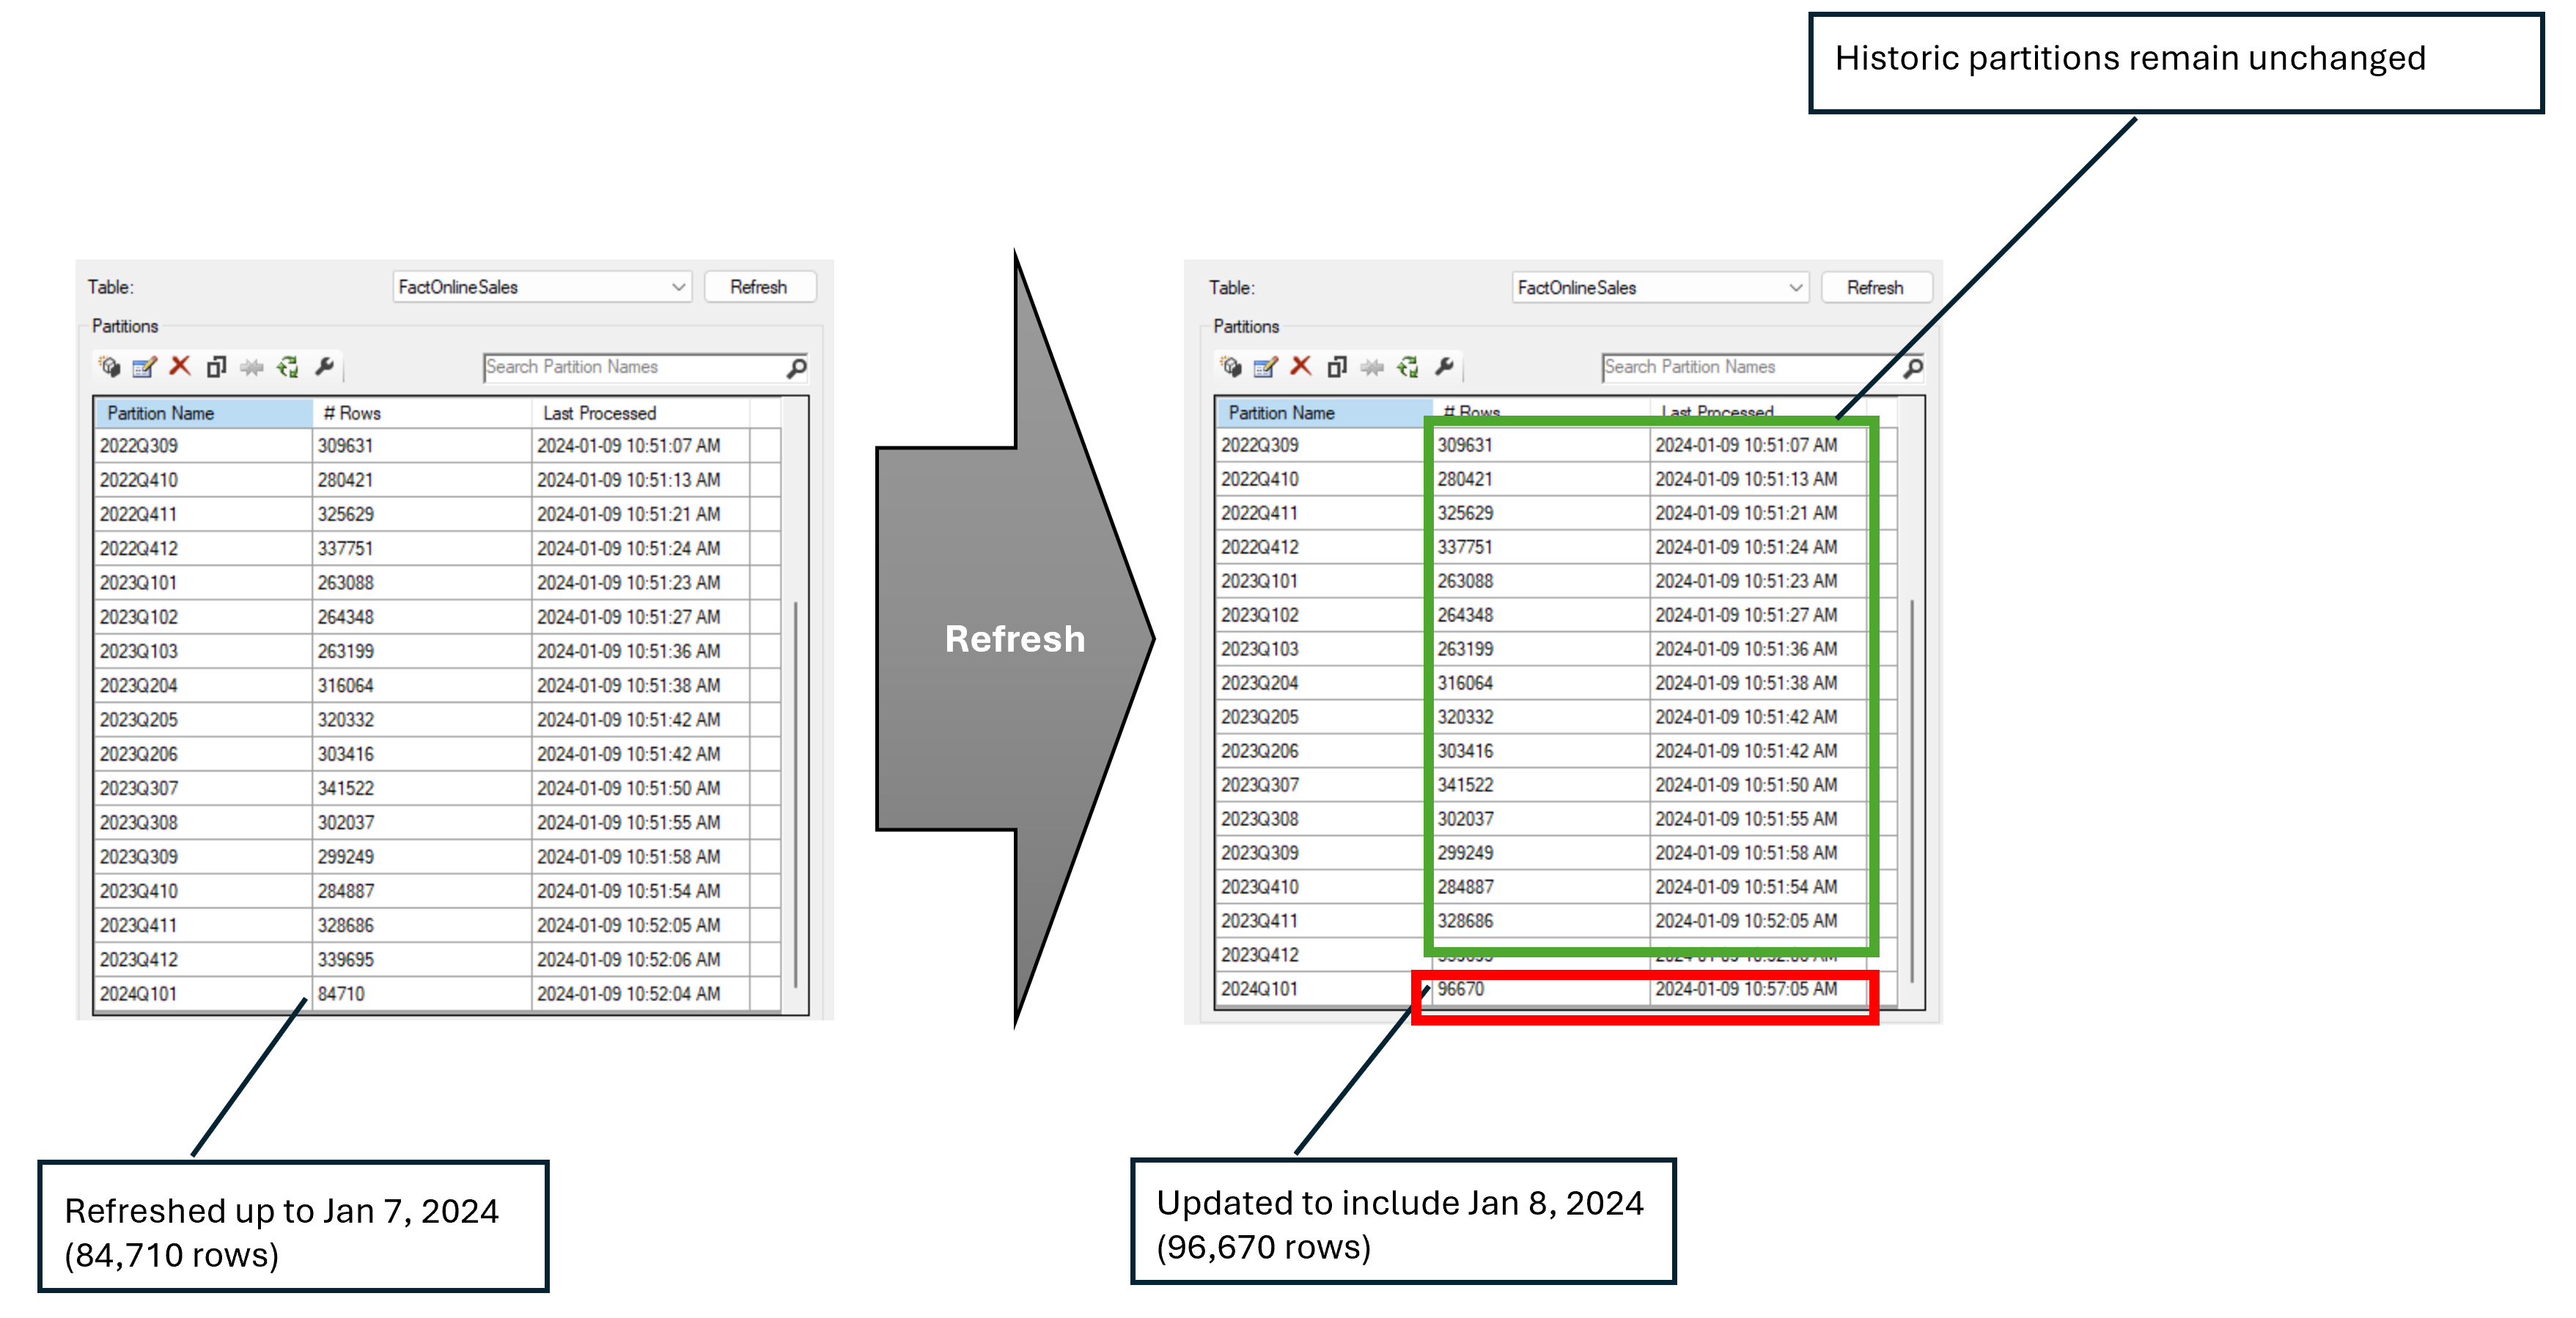
The first refresh will be done on the existing data. We should only see the newest partition refreshed (since there is an additional day in the current month and no changes occurred to prior months).
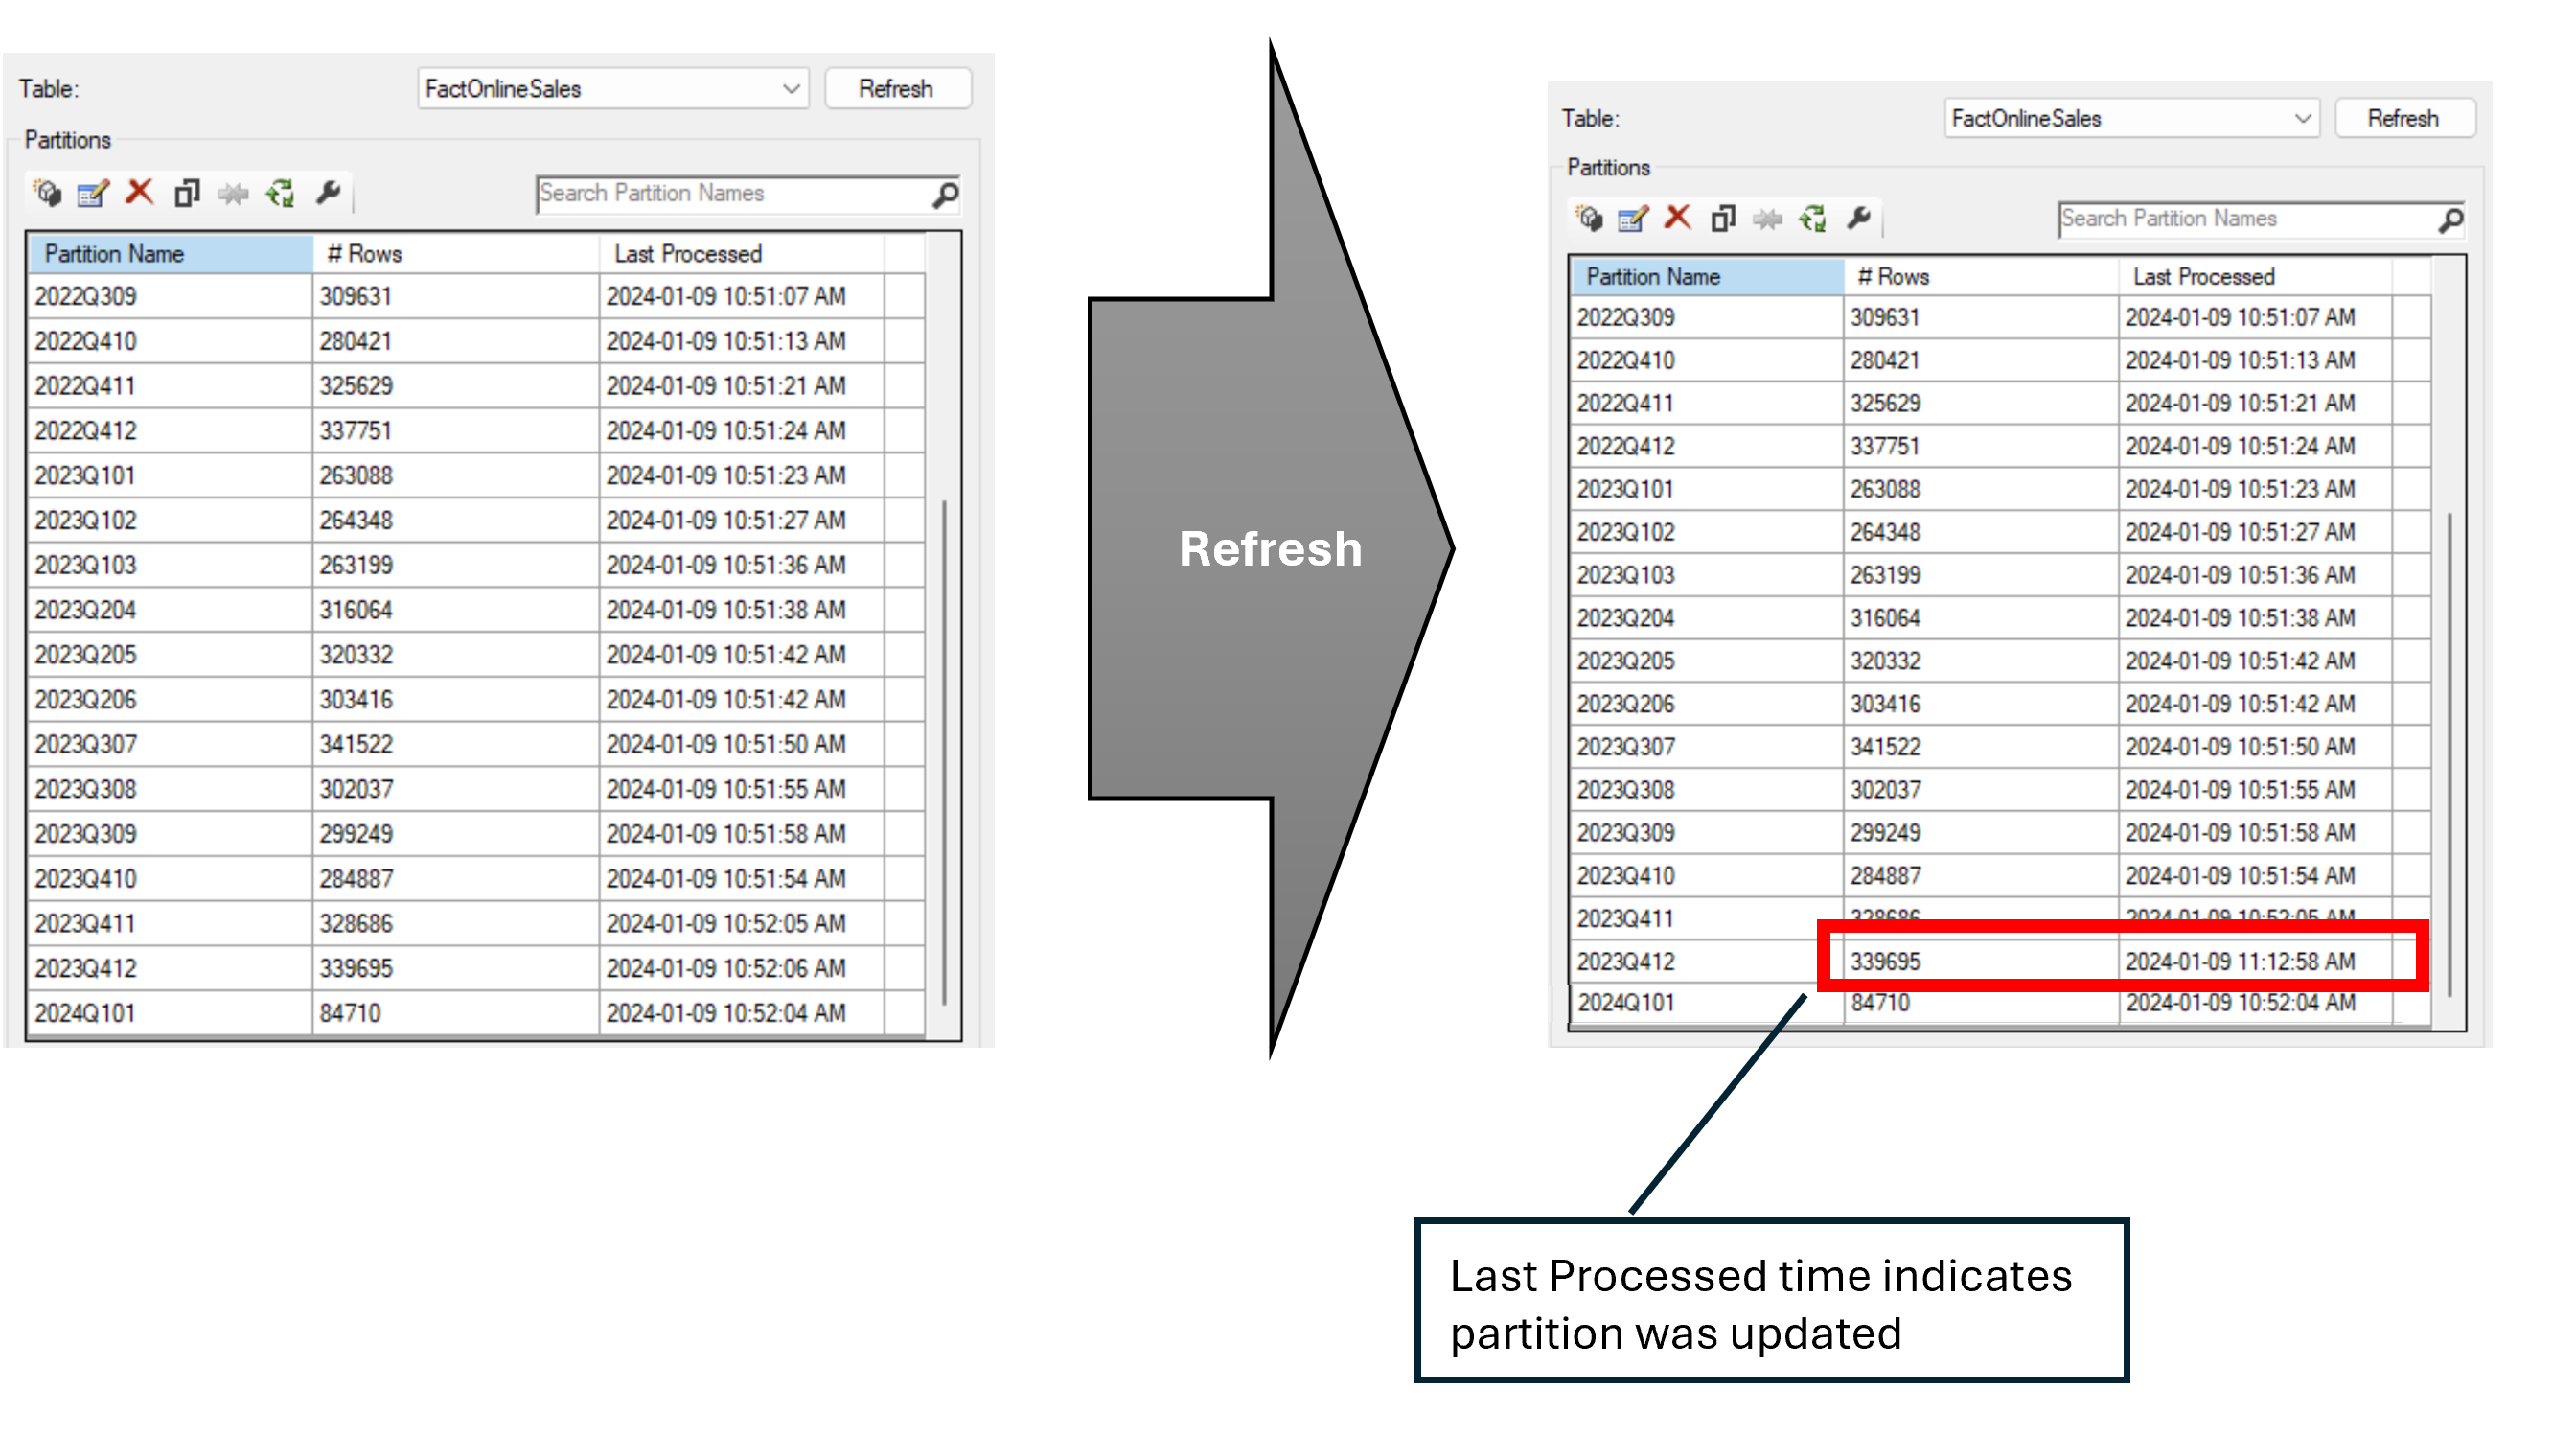
And the second refresh will take place after applying a change to the source values of SalesAmount in the Dec 2023 partition. To demonstrate this we’ll simply add 1 to each SalesAmount in December 2023 to simulate a change.
For this refresh we expect to see a refresh of only the Dec 2023 partition, and we should see the refreshBookmark property updated for this partition. We can inspect the refresh by executing it via a TMSL command as follows:
{
"refresh": {
"type": "full",
"applyRefreshPolicy": true,
"objects": [
{
"database": "<semanticmodel>",
"table": "<tablename>"
}
]
}
}
We can see that PowerBI has detected changes in our partition as expected:
Finished analyzing refresh policy impact for partition ‘
We can further see that the partition was refreshed by viewing the partitions in SSMS
And we can confirm we have an updated refreshBookmark property by scripting our table to TMSL (using Script Table As)
Conclusion
So, there you have it. If you’re using the UI to create your detect data changes policy, you’ll be limited to using a date field, but if you’re willing to venture into 3rd party tools and XMLA endpoints, you can customize this functionality to meet your specific business needs!
References and Further Reading
Modify an Existing Refresh Policy (Tabular Editor Docs)
Incremental refresh for semantic models and real-time data in Power BI - Power BI (Microsoft Learn)
Power BI Incremental Refresh - Understanding Detect Data Changes - Guy in a Cube